
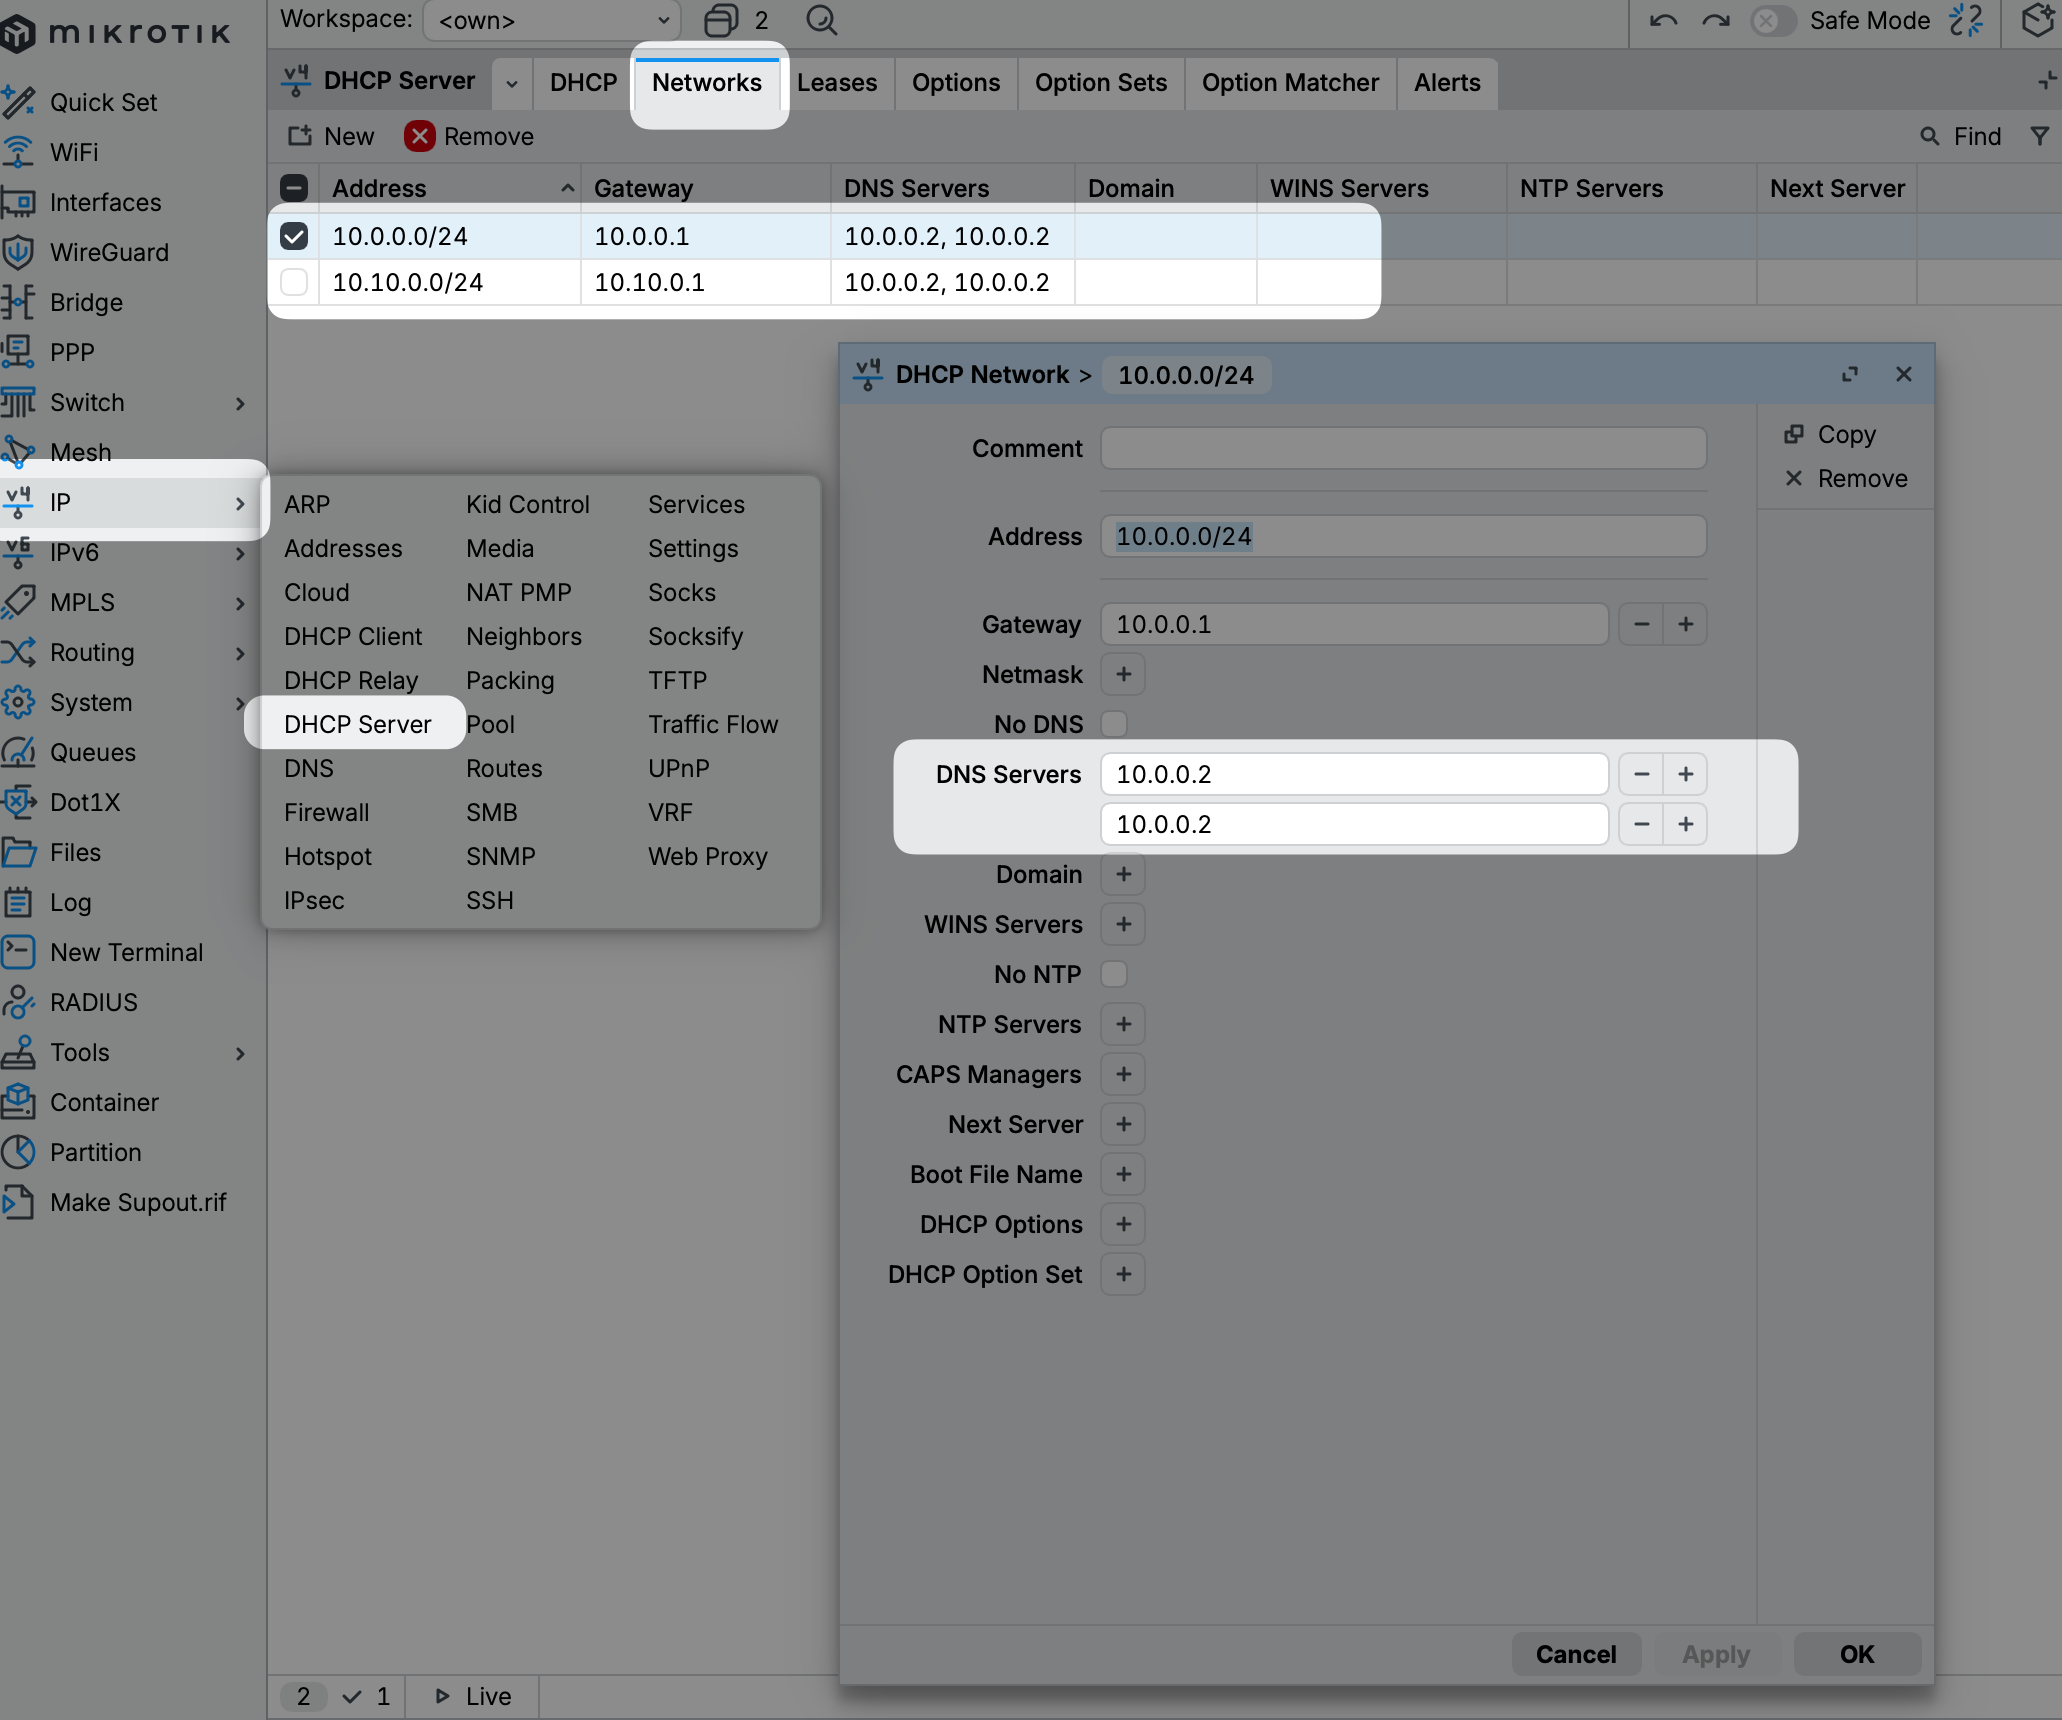
10.0.0.2 是 SMbox 的 IP。
如果配置了 IPv6,在 IPv6 -> ND -> bridge 取消勾选 Advertise DNS。
配置思路:两步缺一不可
SMbox 的分流需要 DNS 和 路由 两步配合才能生效。
- 第一步 DNS 分流:把需要代理的域名解析成 FakeIP(
198.18.0.0/15段)。- 第二步路由分流:把 FakeIP 网段、以及 Telegram 等纯 IP 连接的流量引导到 SMbox。
DNS 只决定哪些域名被解析成 FakeIP,真正把流量送进 SMbox 靠的是路由规则。只配 DNS 不配路由,设备能解析出 FakeIP 却无法上网。下面第一步的两种 DNS 模式只是二选一,但第二步路由分流无论选哪种 DNS 都必须配置。
第一步:DNS 分流(两种模式二选一)
下面两种模式效果一致,根据自己情况二选一即可。
方式一(推荐):LAN DHCP 下发 SMbox 的 IP
LAN DHCP 下发 SMbox 的 IP 作为 DNS,所有设备的 DNS 请求直接交给 SMbox DNS,再由 SMbox 内部的“DNS 分流模式 + 例外设备”控制哪些设备走代理。

方式二:RouterOS DNAT 劫持分流
配置 LAN 口的 DHCP,将 DNS 改为 RouterOS 的 IP,配置方法参考上图。再用 DNAT 把需要代理设备的 53 端口流量劫持到 SMbox。
任何时候不要把 SMbox 的 IP 加入到 proxy_device 中,否则会引起环回导致崩溃。
设置代理的设备,下方二选一:
- 推荐方式:点击
IP -> DHCP Server -> Lease找到需要代理的设备,选中后点击Make Static,然后双击编辑,在Address List填入proxy_device。 - 例如本地 IP 为
10.0.0.20,添加到 address-list 中;千万不要把 SMbox 的 IP 加入到proxy_device中,否则会环回。
/ip firewall address-list
add address=10.0.0.20 list=proxy_device
配置 DNS 劫持:
/ip/firewall/nat/add chain=dstnat action=dst-nat dst-address=10.0.0.1 protocol=udp dst-port=53 src-address-list=proxy_device to-addresses=10.0.0.2 to-ports=53 comment=proxy_dnsnat
/ip/firewall/nat/add chain=dstnat action=dst-nat dst-address=10.0.0.1 protocol=tcp dst-port=53 src-address-list=proxy_device to-addresses=10.0.0.2 to-ports=53 comment=proxy_dnsnat
第二步:路由分流(必做)
无论上一步选哪种 DNS,这一步都必须配置
DNS 只把域名解析成了 FakeIP,把 FakeIP 网段和纯 IP 连接(如 Telegram)的流量真正送到 SMbox,靠的是下面的路由分流规则。漏掉这一步会导致设备能解析出 FakeIP 却无法访问。
将需要代理的目标 IP 添加到 address-list 中。这些是 FakeIP 的网段和 Telegram 的 IP,因为 Telegram 是纯 IP 连接;其他软件也可能有纯 IP 连接,可以根据自己需要添加。
/ip firewall address-list
add address=91.108.56.0/22 list=proxy_cidr
add address=91.108.4.0/22 list=proxy_cidr
add address=91.108.8.0/22 list=proxy_cidr
add address=91.108.16.0/22 list=proxy_cidr
add address=91.108.12.0/22 list=proxy_cidr
add address=149.154.160.0/20 list=proxy_cidr
add address=91.105.192.0/23 list=proxy_cidr
add address=91.108.20.0/22 list=proxy_cidr
add address=185.76.151.0/24 list=proxy_cidr
add address=198.18.0.0/15 list=proxy_cidr
下方 10.0.0.2 要改为你自己的 SMbox IP,10.0.0.1 改为自己路由器的 IP,10.0.0.0/24 改为你自己的网段。
/routing/table/add name=proxy fib
/ip/route/add gateway=10.0.0.2 routing-table=proxy comment=proxy_route
/ip/firewall/mangle/add chain=prerouting dst-address-list=proxy_cidr action=mark-routing new-routing-mark=proxy passthrough=yes/ip/firewall/nat/add chain=srcnat action=masquerade src-address=10.0.0.0/24 dst-address=10.0.0.2如果你配置了防火墙,需要添加 accept 规则:
/ip/firewall/filter/add chain=forward dst-address-list=proxy_cidr action=accept place-before=1
/ip/firewall/filter/add chain=forward src-address-list=proxy_cidr action=accept place-before=1
RouterOS 配置双 SMbox 高可用(可选)
主 SMbox:10.0.0.2。次 SMbox:10.0.0.12。下方主次 IP 要改为你自己的地址。
简而言之就是监听主 SMbox 的 8888 端口,如果主 SMbox 在运行就切换到主 SMbox,不在运行就切换到次 SMbox。
打开 Tools -> Netwatch:
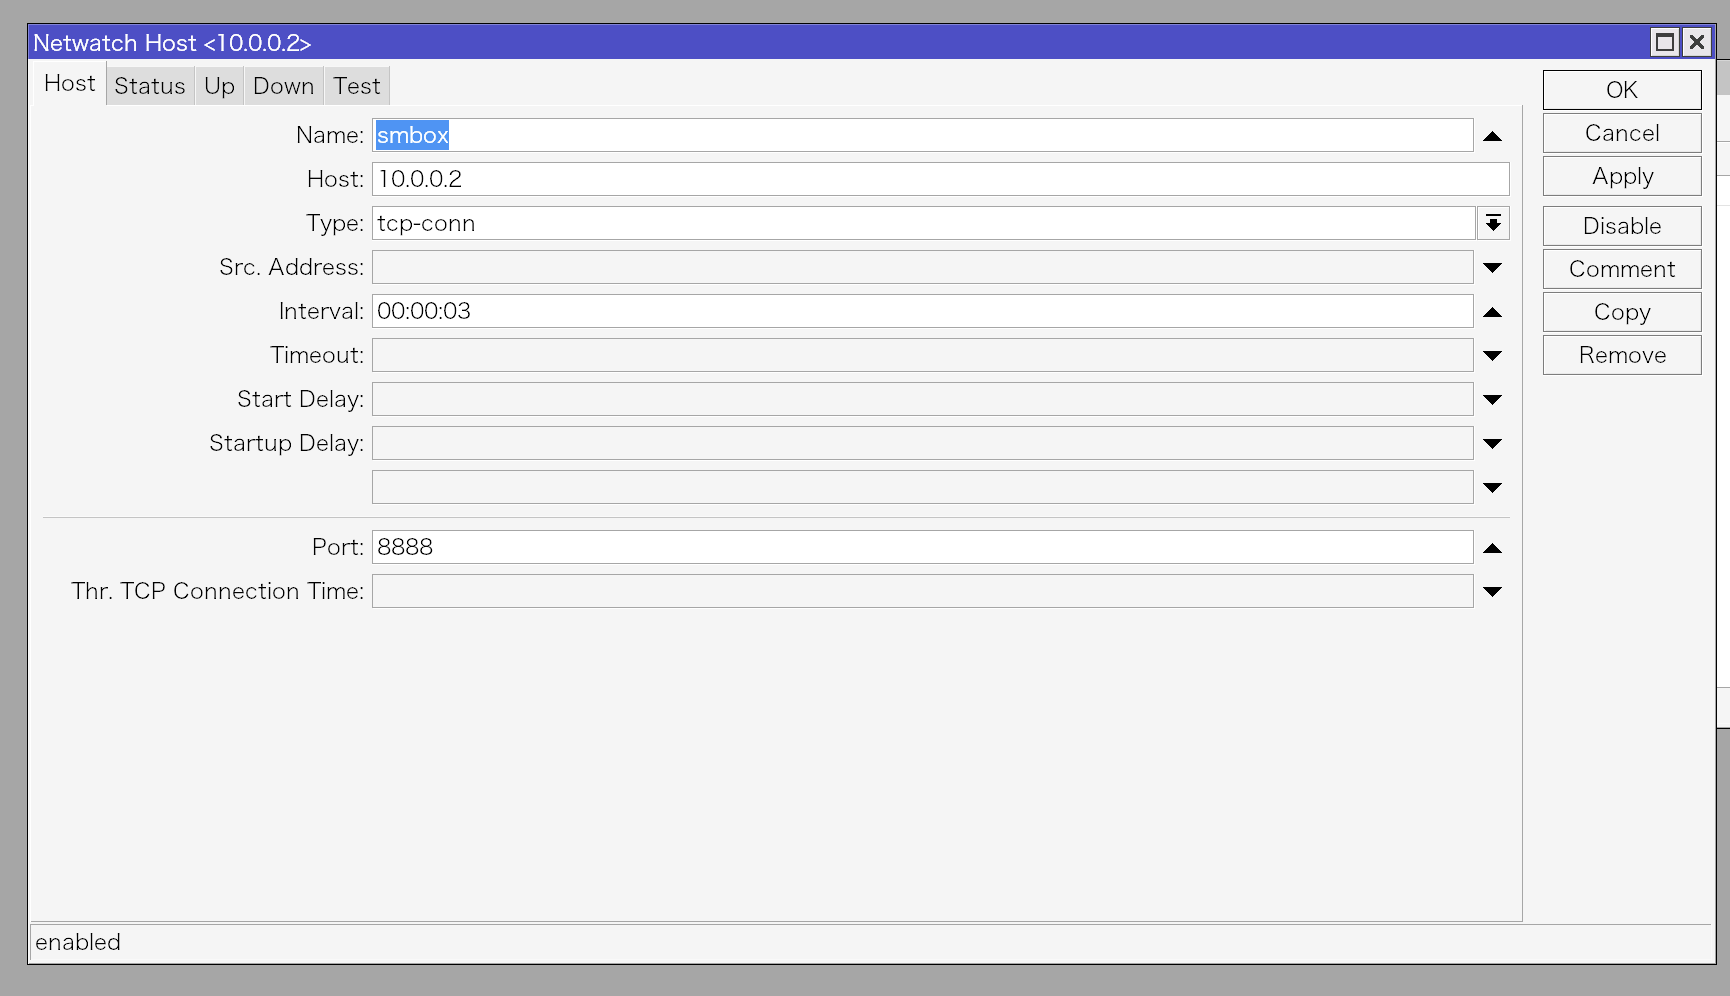
点击 Up,填入以下脚本:
/ip/route/set [/ip/route/find comment="proxy_route"] gateway=10.0.0.2
/ip/firewall/nat/set [/ip/firewall/nat/find comment="proxy_dnsnat"] to-addresses=10.0.0.2
点击 Down,填入以下脚本:
/ip/route/set [/ip/route/find comment="proxy_route"] gateway=10.0.0.12
/ip/firewall/nat/set [/ip/firewall/nat/find comment="proxy_dnsnat"] to-addresses=10.0.0.12原文来源:ROS 配置。